
Replacement of the rear axle hub bolt #2

My Alfa had one damaged hub bolt.  In the past the press-fitting of this hub bolt to the hub became loose, and I had the trouble that the wheel couldnt be removed because the hub bolt was turned together with the wheel nut.  In order to remove the wheel I finally destroyed the nut by drilling after try and error, and the bolt was damaged at that time.  I brought the removed hub to my friends, and asked him the spot-welding to fix the loose bolt to the hub.
Therefore, before removing the damaged hub bolt, I had to remove the spot-welding with the disc grinder.

After removing the point-welding the damaged bolt was easily come off by striking with a hammer.  It seemed that the press fitting of the bolt was loose.


The new hub bolt was inserted.


In order to make the bolt insert more tightly the new bolt was pressed by a vise using the socket as a jig.


This might be enough, however, I still had a doubt because of the trouble happened before.
Near my house a few minute by walking, there was a small ironworks that an old man was the owner. 
I brought the hub there to ask him the spot-welding to eliminate the risk of bolt loosing again.

I explained what I would like him to do.  He kindly accepted my request and welded the bolt very quickly.


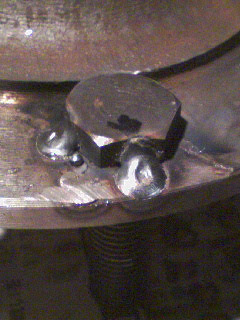
He did the spot-welding at 2 positions.  Perfect!!!

Then, I asked him the price, but he said he didnt need money. 
I said again that I would like to pay, but he didnt change his mind.

THANKS!!!

I would bring a bottle of SAKE next time.


(My original blog was written on 15th Feb. 2009)

Comments

Popular posts from this blog

Tip to repair rubber parts

I disassembled the rear axle before.  There had been no progress on it because I started the repair of the fuel tank during my summer holiday. While painting the fuel tank , I repaired the torn rubber boot of the parking brake wire. I guessed it didn ’ t cost high because it was small rubber part.  But I wanted to try the repair method I read on the magazine article before. This was the condition before the repair.  The rubber was torn apart and separated almost. I used this self-adhesive type butyl tape.  I pasted lots of small pieces of the butyl tape on the back side of the rubber boot.  As time goes by , these tapes would melt and stick together.  After this I applied plenty of adhesive “ Super X Black ” on the rubber boot.  On the magazine of MOTO MAINTENANCE , I read the article that the motorcycle seat was repaired with this method.  So , I wanted to try it. After drying 1 day , it became like this....

Clutch master cylinder overhaul #5

Regarding the clutch master cylinder which I repaired the hole at piston with solder , one of my friend advised me that the solder might not be hard enough.  Therefore , I tried the repair again in another way. Disassembled the clutch master cylinder again. Now I can do it very quickly because I disassembled brake master and clutch master cylinders many times J Heated and removed the solder at the piston hole. I used the soldering iron instead of the burner because I heard giving too much heat on piston should be avoided. In this time , according to the advice from my friend , the repair method is to screw in the thread with strong adhesive into the hole , then grind the thread head to make the piston surface flat.  In order to do it I bought bolts and a grinding stone at the hardware store. Cutting the bolt to adjust the length to fit the hole depth.  Engrave the minus groove at the cut bolt head to make screwing in possible ...

Brake master cylinder overhaul #1

I started the overhaul of the brake master cylinder after the clutch slave cylinder. This day ’ s work was removal and disassembly of the brake master cylinder. My “ onboro ALFA ” is early type ( Mk. I ) 1750GTV RHD.  The brake master cylinder is made by BONARDI and it is installed on the frame under the floor together with the clutch master cylinder ( this is made by BENDITALIA ) . Regarding the removal , there was a little try and error. ( 1 ) Remove the pipes Then , I tried to separate the linkage rod connecting to the brake pedal.  However , the fixing nut was so hard that I changed the process. ( 2 ) Remove the bolts fixing the brake master cylinder on the frame. ( These bolts were also fixing the clutch master cylinder penetrating the frame. ) ( 3 ) & ( 4 ) Separate the linkage rod from the brake pedal , and remove the brake master cylinder together with the linkage rod. ( The linkage rod and the pedal were fixed by a split pin. ) ...